以下内容转载自 这里 。转载的原因是怕他们的网站突然访问不了😂。
研究 HTTPS 的双向认证实现与原理,踩了不少坑,终于整个流程都跑通了,现在总结出一篇文档来,把一些心得,特别是容易踩坑的地方记录下来。
1. 原理 双向认证,顾名思义,客户端和服务器端都需要验证对方的身份,在建立 HTTPS 连接的过程中,握手的流程比单向认证多了几步。单向认证的过程,客户端从服务器端下载服务器端公钥证书进行验证,然后建立安全通信通道。双向通信流程,客户端除了需要从服务器端下载服务器的公钥证书进行验证外,还需要把客户端的公钥证书上传到服务器端给服务器端进行验证,等双方都认证通过了,才开始建立安全通信通道进行数据传输。
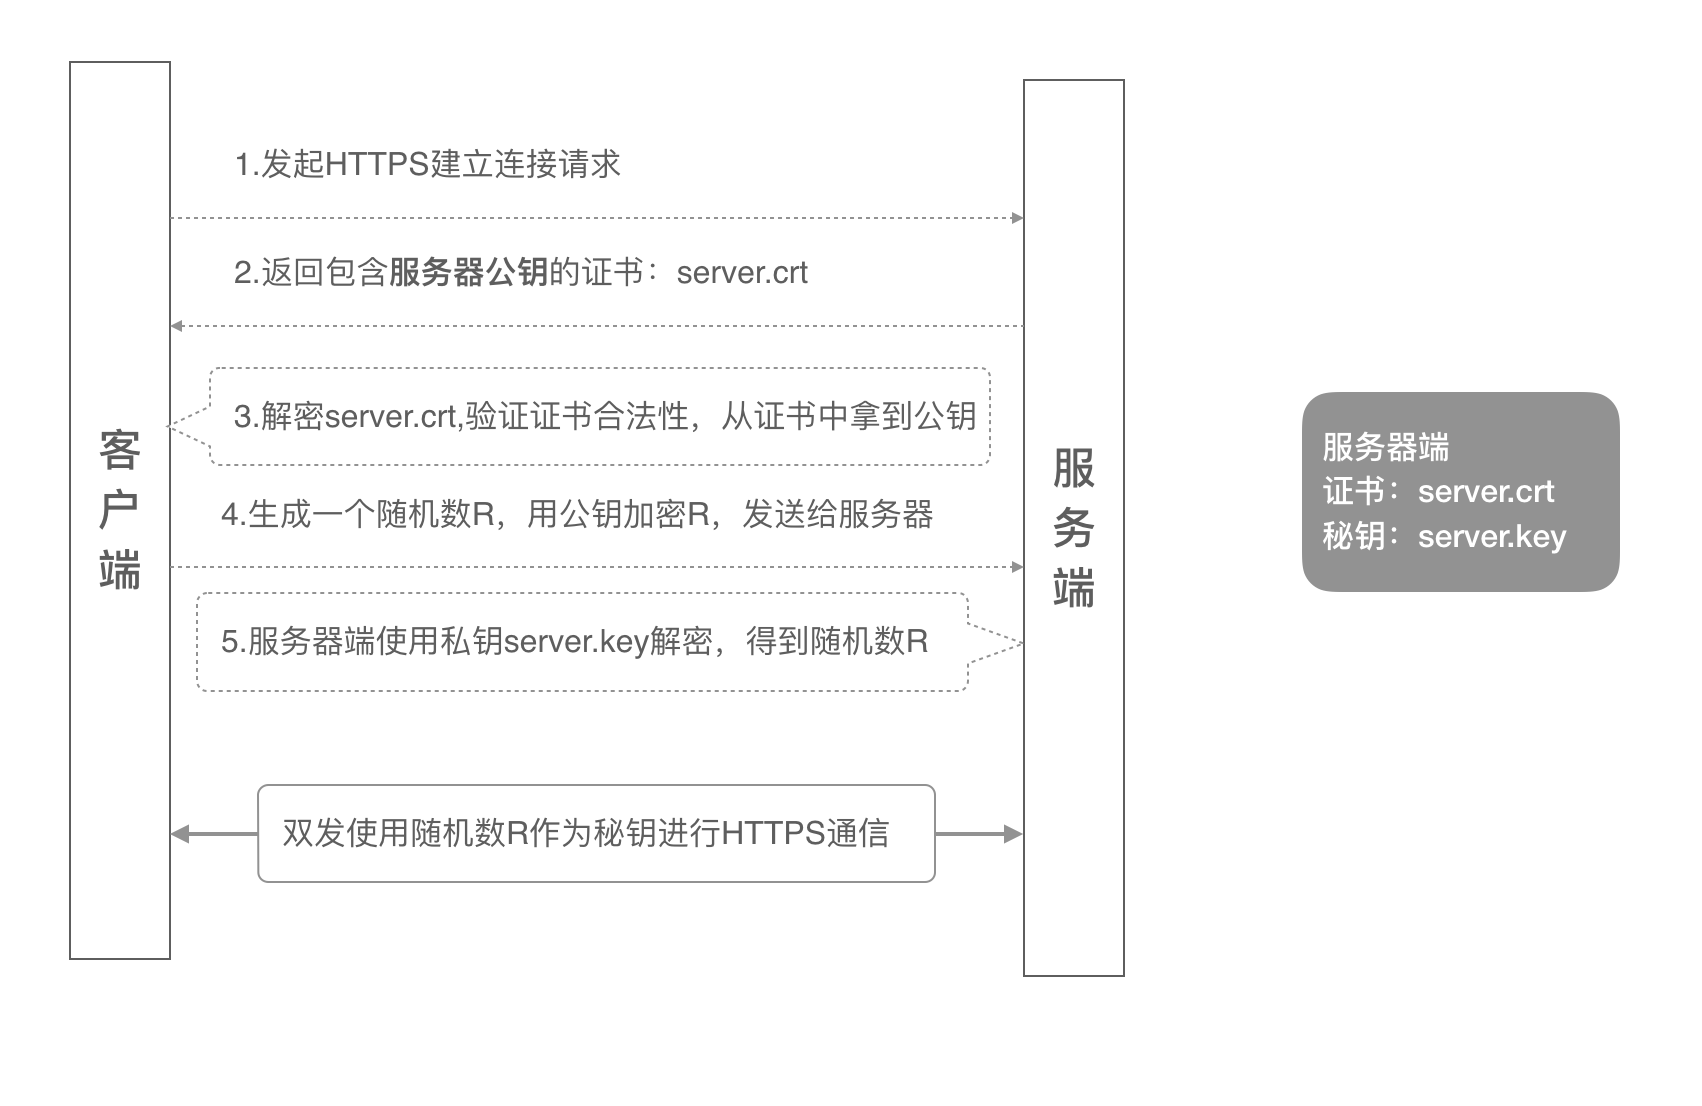
1.1 单向认证流程 单向认证流程中,服务器端保存着公钥证书和私钥两个文件,整个握手过程如下:
客户端发起建立 HTTPS 连接请求,将 SSL 协议版本的信息发送给服务器端;
服务器端将本机的公钥证书(server.crt)发送给客户端;
客户端读取公钥证书 (server.crt),取出了服务端公钥;
客户端生成一个随机数(密钥 R),用刚才得到的服务器公钥去加密这个随机数形成密文,发送给服务端;
服务端用自己的私钥 (server.key) 去解密这个密文,得到了密钥 R
服务端和客户端在后续通讯过程中就使用这个密钥 R 进行通信了。
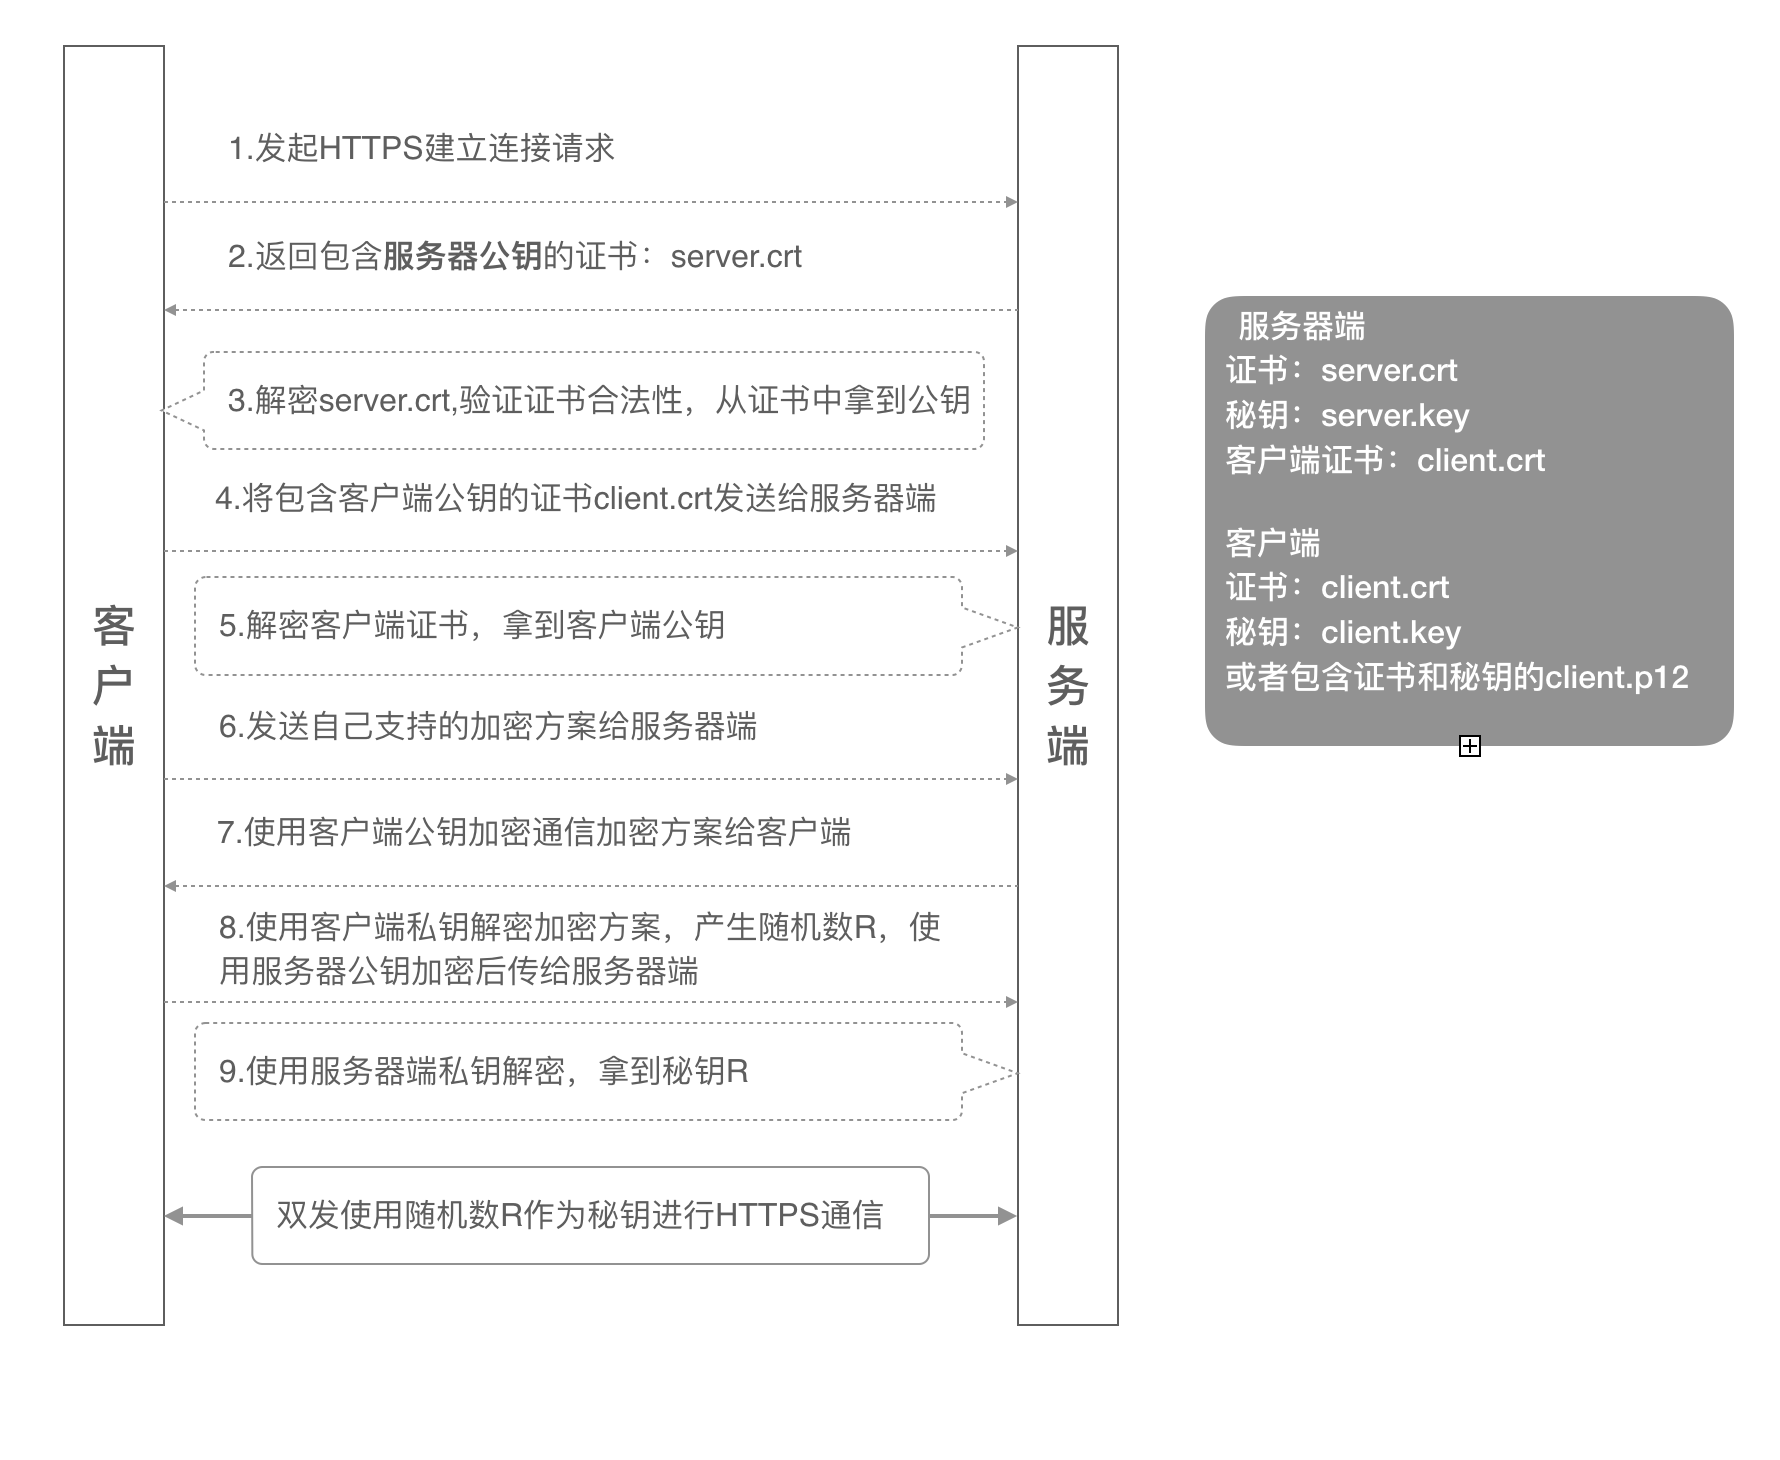
1.2 双向认证流程
客户端发起建立 HTTPS 连接请求,将 SSL 协议版本的信息发送给服务端;
服务器端将本机的公钥证书 (server.crt) 发送给客户端;
客户端读取公钥证书 (server.crt),取出了服务端公钥;
客户端将客户端公钥证书 (client.crt) 发送给服务器端;
服务器端解密客户端公钥证书,拿到客户端公钥;
客户端发送自己支持的加密方案给服务器端;
服务器端根据自己和客户端的能力,选择一个双方都能接受的加密方案,使用客户端的公钥加密后发送给客户端;
客户端使用自己的私钥解密加密方案,生成一个随机数 R,使用服务器公钥加密后传给服务器端;
服务端用自己的私钥去解密这个密文,得到了密钥 R
服务端和客户端在后续通讯过程中就使用这个密钥 R 进行通信了。
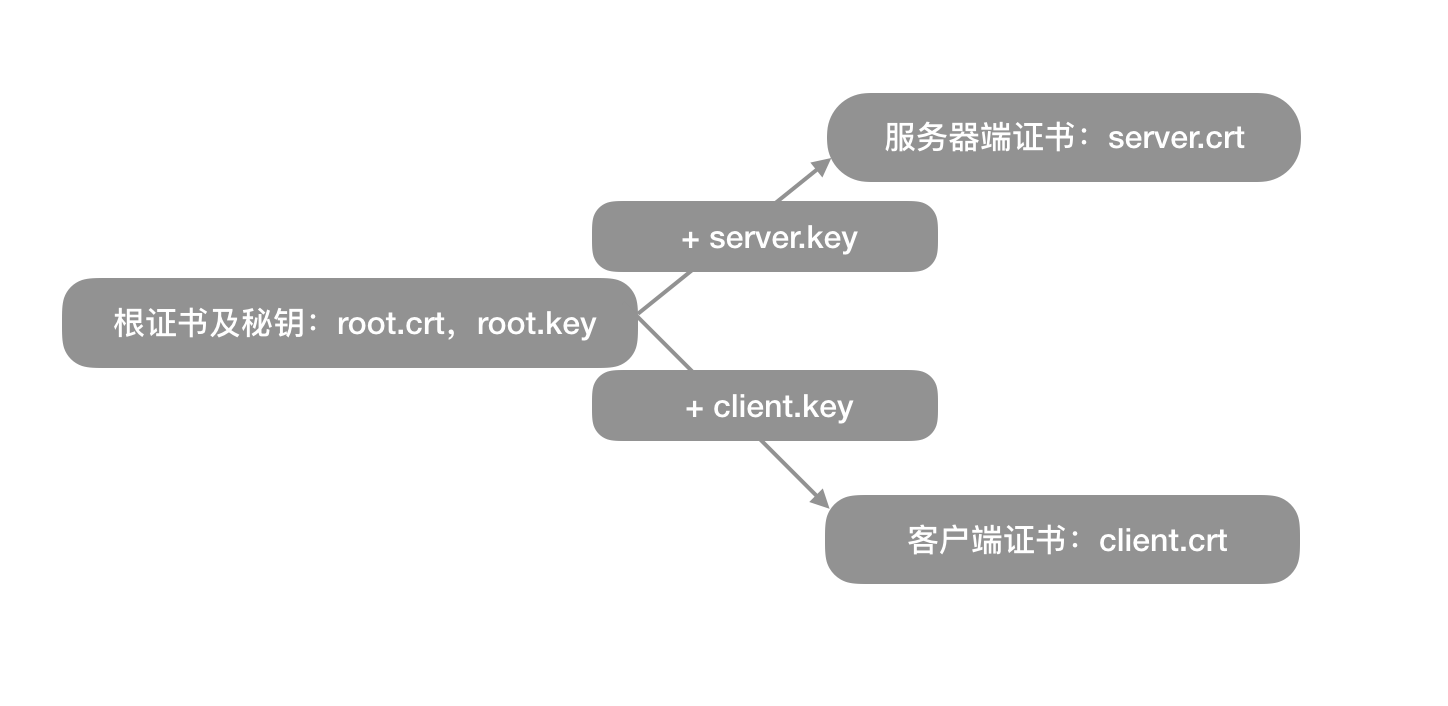
2. 证书生成 从上一章内容中,我们可以总结出来,如果要把整个双向认证的流程跑通,最终需要五个证书文件:
服务器端公钥证书:server.crt
服务器端私钥文件:server.key
客户端公钥证书:client.crt
客户端私钥文件:client.key
客户端集成证书(包括公钥和私钥,用于浏览器访问场景):client.p12
生成这一些列证书之前,我们需要先生成一个 CA 根证书,然后由这个 CA 根证书颁发服务器公钥证书和客户端公钥证书。
我们可以全程使用 Openssl 来生成一些列的自签名证书,自签名证书没有通过证书机构的认证,很多浏览器会认为不安全,但我们用来实验是足够的。需要在本机安装了 Openssl 后才能继续本章的实验。
2.1 生成自签名根证书
创建根证书私钥:
1 $ openssl genrsa -out root.key 1024
创建根证书请求文件:
1
2
3
4
5
6
7
8
9
10
11
12
13
$ openssl req -new -out root.csr -key root.key 后续参数请自行填写,下面是一个例子: Country Name (2 letter code) [XX]:cn State or Province Name (full name) []:bj Locality Name (eg, city) [Default City]:bj Organization Name (eg, company) [Default Company Ltd]:alibaba Organizational Unit Name (eg, section) []:test Common Name (eg, your name or your servers hostname) []:www.yourdomain.com Email Address []:a.alibaba.com A challenge password []: An optional company name []:
创建根证书:
1 $ openssl x509 -req -in root.csr -out root.crt -signkey root.key -CAcreateserial -days 3650
在创建证书请求文件的时候需要注意三点,下面生成服务器请求文件和客户端请求文件均要注意这三点:
Common Name 填写证书对应的服务域名;
所有字段的填写,根证书、服务器端证书、客户端证书需保持一致
最后的密码可以直接回车跳过。
经过上面三个命令行,我们最终可以得到一个签名有效期为 10 年的根证书 root.crt,后面我们可以用这个根证书去颁发服务器证书和客户端证书。
2.2 生成自签名服务器端证书
生成服务器端证书私钥:
1 $ openssl genrsa -out server.key 1024
生成服务器证书请求文件,过程和注意事项参考根证书,本节不详述:
1 $ openssl req -new -out server.csr -key server.key
生成服务器端公钥证书
1 $ openssl x509 -req -in server.csr -out server.crt -signkey server.key -CA root.crt -CAkey root.key -CAcreateserial -days 3650
经过上面的三个命令,我们得到:
server.key:服务器端的秘钥文件
server.crt:有效期十年的服务器端公钥证书,使用根证书和服务器端私钥文件一起生成
2.3 生成自签名客户端证书
生成客户端证书秘钥:
1 $ openssl genrsa -out client.key 1024
生成客户端证书请求文件,过程和注意事项参考根证书,本节不详述:
1 $ openssl req -new -out client.csr -key client.key
生客户端证书
1 $ openssl x509 -req -in client.csr -out client.crt -signkey client.key -CA root.crt -CAkey root.key -CAcreateserial -days 3650
生客户端 P12 格式证书
1 $ openssl pkcs12 -export -clcerts -in client.crt -inkey client.key -out client.p12
经过上面的三个命令,我们得到:
client.key:客户端的私钥文件
client.crt:有效期十年的客户端证书,使用根证书和客户端私钥一起生成
client.p12:客户端 p12 格式,这个证书文件包含客户端的公钥和私钥,主要用来给浏览器访问使用
3.Nginx 配置 有了上面的一些列证书,我们可以在 Nginx 服务器上配置双向认证的 HTTPS 服务了,具体配置方式如下:
1
2
3
4
5
6
7
8
9
10
11
12
13
14
server { listen 443 ssl; server_name www.yourdomain.com; ssl on ; ssl_certificate /data/sslKey/server.crt; ssl_certificate_key /data/sslKey/server.key; ssl_client_certificate /data/sslKey/client.crt; ssl_verify_client on ; location / { root html; index index.html index.htm; } }
具体就是将服务器端的两个证书文件 (server.crt/server.key) 和客户端的公钥证书文件 (client.crt) 的路径配置到 Nginx 的 server 节点配置中,并且把 ssl_verify_client 这个参数设置为 on。ssl_verify_depth 1 ;配置完成后,执行 nginx -s reload 重新加载下就生效了。
4.curl 调用 使用 curl 加上证书路径,可以直接测试 Nginx 的 HTTPS 双向认证是否配置成功。
带证书的成功调用
1 2 3 4 5 6 7 8 9 10 11 12 13 14 15 16 17 18 19 20 21 22 23 24 25 26 27 28 29 30 31 32 33 34 35 36 37 38 39 40 41 42 43 44 45 46 47 48 49 50 51 52 $ curl --cert ./client.crt --key ./client.key https://integration-fred2 .fredhuang.com -k -v * Rebuilt URL to: https://integration-fred2 .fredhuang.com/ * Trying 47.91 .39.145 ... * TCP_NODELAY set * Connected to integration-fred2 .fredhuang.com (47.91 .39.145 ) port 443 ( * ALPN, offering h2 * ALPN, offering http/1.1 * Cipher selection: ALL:!EXPORT:!EXPORT40:!EXPORT56:!aNULL:!LOW:!RC4:@STRENGTH * successfully set certificate verify locations: * CAfile: /etc/ssl/cert.pem CApath: none * TLSv1.2 (OUT), TLS handshake, Client hello (1 ): * TLSv1.2 (IN ), TLS handshake, Server hello (2 ): * TLSv1.2 (IN ), TLS handshake, Certificate (11 ): * TLSv1.2 (IN ), TLS handshake, Server key exchange (12 ): * TLSv1.2 (IN ), TLS handshake, Request CERT (13 ): * TLSv1.2 (IN ), TLS handshake, Server finished (14 ): * TLSv1.2 (OUT), TLS handshake, Certificate (11 ): * TLSv1.2 (OUT), TLS handshake, Client key exchange (16 ): * TLSv1.2 (OUT), TLS handshake, CERT verify (15 ): * TLSv1.2 (OUT), TLS change cipher, Client hello (1 ): * TLSv1.2 (OUT), TLS handshake, Finished (20 ): * TLSv1.2 (IN ), TLS change cipher, Client hello (1 ): * TLSv1.2 (IN ), TLS handshake, Finished (20 ): * SSL connection using TLSv1.2 / ECDHE-RSA-AES128-GCM-SHA256 * ALPN, server accepted to use h2 * Server certificate: * subject: C=CN; ST=BeiJing; L=BeiJing; O=Alibaba; OU=Test; CN=integration-fred2 .fredhuang.com; emailAddress=a@alibaba.com * start date: Oct 30 06 :43 :19 2019 GMT * expire date: Oct 27 06 :43 :19 2029 GMT * issuer: C=CN; ST=BeiJing; L=BeiJing; O=Alibaba; OU=Test; CN=integration-fred2 .fredhuang.com; emailAddress=a@alibaba.com * SSL certificate verify result: self signed certificate (18 ), continuing anyway. * Using HTTP2, server supports multi-use * Connection state changed (HTTP/2 confirmed) * Copying HTTP/2 data in stream buffer to connection buffer after upgrade: len=0 * Using Stream ID: 1 (easy handle 0x7f8ae1809a00) > GET / HTTP/2 > Host: integration-fred2 .fredhuang.com > User-Agent : curl /7.54 .0 > Accept: */* > * Connection state changed (MAX_CONCURRENT_STREAMS updated)! < HTTP/2 200 < server: Tengine < date: Fri, 01 Nov 2019 11 :16 :39 GMT < content-type : text/plain;charset=UTF-8 < content-length : 0
不带证书的失败调用
1
2
3
4
5
6
7
8
9
10
11
12
13
14
15
16
17
18
19
20
21
22
23
24
25
26
27
28
29
30
31
32
33
34
35
36
37
38
39
40
41
42
43
44
45
46
47
48
49
50
51
52
53
54
55
56
57
58
59
60
61
62
63
64
65
66
67
68
69
70
71
72
73
$ curl https://integration-fred2 .fredhuang.com -k -v * Rebuilt URL to: https://integration-fred2 .fredhuang.com/ * Trying 47.91 .39.145 ... * TCP_NODELAY set * Connected to integration-fred2 .fredhuang.com (47.91 .39.145 ) port 443 ( * ALPN, offering h2 * ALPN, offering http/1.1 * Cipher selection: ALL:!EXPORT:!EXPORT40:!EXPORT56:!aNULL:!LOW:!RC4:@STRENGTH * successfully set certificate verify locations: * CAfile: /etc/ssl/cert.pem CApath: none * TLSv1.2 (OUT), TLS handshake, Client hello (1 ): * TLSv1.2 (IN ), TLS handshake, Server hello (2 ): * TLSv1.2 (IN ), TLS handshake, Certificate (11 ): * TLSv1.2 (IN ), TLS handshake, Server key exchange (12 ): * TLSv1.2 (IN ), TLS handshake, Request CERT (13 ): * TLSv1.2 (IN ), TLS handshake, Server finished (14 ): * TLSv1.2 (OUT), TLS handshake, Certificate (11 ): * TLSv1.2 (OUT), TLS handshake, Client key exchange (16 ): * TLSv1.2 (OUT), TLS change cipher, Client hello (1 ): * TLSv1.2 (OUT), TLS handshake, Finished (20 ): * TLSv1.2 (IN ), TLS change cipher, Client hello (1 ): * TLSv1.2 (IN ), TLS handshake, Finished (20 ): * SSL connection using TLSv1.2 / ECDHE-RSA-AES128-GCM-SHA256 * ALPN, server accepted to use h2 * Server certificate: * subject: C=CN; ST=BeiJing; L=BeiJing; O=Alibaba; OU=Test; CN=integration-fred2 .fredhuang.com; emailAddress=a@alibaba.com * start date: Oct 30 06 :43 :19 2019 GMT * expire date: Oct 27 06 :43 :19 2029 GMT * issuer: C=CN; ST=BeiJing; L=BeiJing; O=Alibaba; OU=Test; CN=integration-fred2 .fredhuang.com; emailAddress=a@alibaba.com * SSL certificate verify result: self signed certificate (18 ), continuing anyway. * Using HTTP2, server supports multi-use * Connection state changed (HTTP/2 confirmed) * Copying HTTP/2 data in stream buffer to connection buffer after upgrade: len=0 * Using Stream ID: 1 (easy handle 0x7fcc52805e00) > GET / HTTP/2 > Host: integration-fred2 .fredhuang.com > User-Agent : curl /7.54 .0 > Accept: */* > * Connection state changed (MAX_CONCURRENT_STREAMS updated)! < HTTP/2 400 < server: Tengine < date: Fri, 01 Nov 2019 11 :25 :28 GMT < content-type : text/html < content-length : 685 < <!DOCTYPE HTML PUBLIC "-//IETF//DTD HTML 2.0//EN" > <html> <head><title>400 No required SSL certificate was sent</title></head> <body> <center><h1>400 Bad Request</h1></center> <center>No required SSL certificate was sent</center> Sorry for the inconvenience.<br/> Please report this message and include the following information to us.<br/> Thank you very much!</p> <table> <tr> <td>URL:</td> <td>https://integration-fred2 .fredhuang.com:444 /</td> </tr> <tr> <td>Server:</td> <td>cag-access -tengine011192099198 .au49</td> </tr> <tr> <td>Date:</td> <td>2019 /11 /01 19 :25 :28 </td> </tr> </table> <hr/>Powered by Tengine<hr><center>tengine</center> </body> </html>
5.Java 调用 由于使用的是自签名证书,使用 ApacheHttpClient 去调用的话,需要将服务器证书加入可信任证书库中,才能成功调用,也可以在代码中简单忽略证书。
1
2
$ cd $JAVA_HOME $ sudo ./bin/keytool -import -alias ttt -keystore cacerts -file /Users/fred/temp/cert5/server.crt
将服务器端公钥证书设置为可信证书后,使用以下代码可以直接发起带客户端证书的 HTTPS 请求:
1
2
3
4
5
6
7
8
9
10
11
12
13
14
15
16
17
18
19
20
21
22
23
24
25
26
27
28
29
30
31
32
33
34
35
36
37
38
39
40
41
42
43
44
45
46
47
48
49
50
51
52
53
54
55
56
57
58
import org.apache.http.HttpEntity;import org.apache.http.client.methods.CloseableHttpResponse;import org.apache.http.client.methods.HttpGet;import org.apache.http.conn.ssl.SSLConnectionSocketFactory;import org.apache.http.impl.client.CloseableHttpClient;import org.apache.http.impl.client.HttpClients;import org.apache.http.ssl.SSLContexts;import org.apache.http.util.EntityUtils;import javax.net.ssl.SSLContext;import java.io.File;import java.io.FileInputStream;import java.io.InputStream;import java.security.KeyStore;public class HttpClientWithClientCert private final static String PFX_PATH = "/Users/fred/temp/cert5/client.p12" ; private final static String PFX_PWD = "123456" ; public static String sslRequestGet (String url) throws Exception KeyStore keyStore = KeyStore.getInstance("PKCS12" ); InputStream instream = new FileInputStream(new File(PFX_PATH)); try { keyStore.load(instream, PFX_PWD.toCharArray()); } finally { instream.close(); } SSLContext sslcontext = SSLContexts.custom().loadKeyMaterial(keyStore, PFX_PWD.toCharArray()).build(); SSLConnectionSocketFactory sslsf = new SSLConnectionSocketFactory(sslcontext , new String[] { "TLSv1" } , null , SSLConnectionSocketFactory.getDefaultHostnameVerifier()); CloseableHttpClient httpclient = HttpClients.custom().setSSLSocketFactory(sslsf).build(); try { HttpGet httpget = new HttpGet(url); CloseableHttpResponse response = httpclient.execute(httpget); try { HttpEntity entity = response.getEntity(); String jsonStr = EntityUtils.toString(response.getEntity(), "UTF-8" ); EntityUtils.consume(entity); return jsonStr; } finally { response.close(); } } finally { httpclient.close(); } } public static void main (String[] args) throws Exception System.out.println(System.getProperty("java.home" )); System.out.println(sslRequestGet("https://integration-fred2.fredhuang.com/test" )); } }
6. 存疑 网上很多文章都描述到 Nginx 配置中的客户端证书(ssl_client_certificate)可以配置根证书 root.crt,然后就可以适配所有这个根证书办法的客户端公钥证书了。我试了,使用 root.crt 作为 ssl_client_certificate 的值,然后使用 client.crt 来访问,发现不行,Nginx 会报这个错误:
1 2 3 4 5 6 7 8 <html > <head > <title > 400 The SSL certificate error</title > </head > <body > <center > <h1 > 400 Bad Request</h1 > </center > <center > The SSL certificate error</center > <hr > <center > nginx/1.17.5</center > </body > </html >
这个特性原作者一直没有配置成功 (我也没配置成功),有可能是配置有问题,也有可能是网上文章不靠谱,写错了。
本文转载自:「阿里云开发者社区」,原文:https://tinyurl.com/yaamh7vf ,版权归原作者所有。欢迎投稿,投稿邮箱: editor@hi-linux.com 。
7. 扩展阅读 (本文核心) 在原文基础上,我在分享一个你在大多数网站和搜索引擎中都找不到的很实用的小技巧,说得这么神秘到底是什么呢?HTTPS 双向认证的文章都是使用 CA 自签的方式进行。虽然这能实现目的,但方法不太优雅。SSL 证书全面普及的当下,你其实很有必要申请一个受信证书来进行 HTTPS 双向认证。这样看上去不但更权威,而且实现上也更便捷一些。
使用受信证书进行双向认证 要使用受信证书进行认证的前提条件:当然是你必须有一个权威 CA 机构给你签发的证书。
如果你是土豪,随便购买一个就行了。
如果你囊中羞涩,也不要紧,可以去申请一个免费的 SSL 证书。目前 Let's Encrypt、阿里云 都可以申请,具体方法就不在这展开了,你可以直接在公众号上搜索相关文章。
为了便于管理和多场景使用,建议直接申请通配证书。
证书准备完成后,接下来当然是直接使用它。因为是受信证书,上面所有的证书自签操作都不需要了,你只需直接配置 Nginx 就可以了。
1
2
3
4
5
6
7
8
9
10
11
12
13
14
15
16
17
18
19
20
21
22
23
24
25
26
server { listen 443 ssl; access_log /var/log/nginx/accesse.log main; server_name ci.hi-linux.com; ssl_certificate /etc/ssl/certs/hi-linux.com/hi-linux.com.pem; ssl_certificate_key /etc/ssl/certs/hi-linux.com/hi-linux.com.key; ssl_client_certificate /etc/ssl/certs/hi-linux.com/hi-linux.com.pem; ssl_verify_depth 3 ; ssl_session_timeout 5m ; ssl_verify_client on ; ssl_protocols SSLv2 SSLv3 TLSv1; ssl_ciphers ALL:!ADH:!EXPORT56:RC4+RSA:+HIGH:+MEDIUM:+LOW:+SSLv2:+EXP; ssl_prefer_server_ciphers on ; location / { proxy_pass http://ci/; proxy_set_header Host $host:$server_port; proxy_set_header X-Real-IP $remote_addr; proxy_set_header X-Forwarded-Proto $scheme; } } }
注意:ssl_certificate 指定的是证书,ssl_certificate_key 指定是证书对应的私钥,请自行将对应证书文件放到配置文件中指定的目录中。ssl_client_certificate 和 ssl_verify_depth 这两个参数。
ssl_client_certificate 主要用于指定客户端所使用的证书,这里可以直接使用受信证书机构签发的证书文件。ssl_verify_depth 这个参数是使用受信证书能成功进行客户端验证的关键,注意它的值是 3。
因为当 ssl_verify_depth 设置为 1( Nginx 的默认值)的时候,服务端只会接受直接被 CA 签发的客户端证书或自签名的证书。也就是说,直接尝试使用中级 CA 来验证客户端是无法通过的,OpenSSL 会自动的去找中级 CA 的签发者并一层层验证上去,直到找到根证书。CA 和根 CA 都放在信任证书列表中,由于最终 ssl_verify_depth 为 2 的缘故,验证还是通不过的。
CA 文件中必须同时存在 中级 CA 和根 CA,必须构成完整证书链,不能少任何一个;
默认的验证深度 ssl_verify_depth 是 1,中级 CA 签发的客户端证书一律无法通过认证,需要增大该值,所以我们上面配置中 ssl_verify_depth 值为 3 。
为了客户端方便导入,你同样还是需要将证书文件转换成 P12 格式。当然你还可以在转换的过程中给证书加个密码,以保证证书的安全。
1 $ openssl pkcs12 -export -clcerts -in hi-linux.com.pem -inkey hi-linux.com.key -out hi-linux.com-client.p12
至此,HTTPS 双向证书的实现就讲完了,如果你还有什么更好的补充,欢迎大家积极留言交流哟!


